The Official H-Body Internet Community
Vega, Monza, Sunbird, Astre, Starfire, Skyhawk
Aftermarket LS Oil pan?
Moderator: Moderators
Re: Aftermarket LS Oil pan?
![]() by monzaaddict » Sun Jul 19, 2020 8:15 am
by monzaaddict » Sun Jul 19, 2020 8:15 am
- monzaaddict
- Posts: 2600
- Joined: Sun Jul 02, 2006 3:04 pm
Re: Aftermarket LS Oil pan?
![]() by n8thenetninja » Tue Jul 21, 2020 4:22 pm
by n8thenetninja » Tue Jul 21, 2020 4:22 pm
https://tech.arp-bolts.com/instructions/244-2901.pdf
I replaced the cam sensor this weekend, and there noted that there was oil on both sides of the o-ring. I haven't had a chance to get underneath and clean the oil off everything, so it's hard to tell if that stopped the leak or not. Guess time and the dipstick will tell.
-

n8thenetninja - Posts: 78
- Joined: Fri Oct 30, 2015 6:56 pm
1975 Chevrolet Vega Hatchback
Re: Aftermarket LS Oil pan?
![]() by n8thenetninja » Thu Jul 23, 2020 2:33 am
by n8thenetninja » Thu Jul 23, 2020 2:33 am
 Good thing the benevolent government is looking out for us, or we would probably do all sorts of things that might keep their candidate from being elected. Or maybe we would just mind our own business and have a little fun. God forbid.
-
n8thenetninja - Posts: 78
- Joined: Fri Oct 30, 2015 6:56 pm
1975 Chevrolet Vega Hatchback
Re: Aftermarket LS Oil pan?
![]() by n8thenetninja » Mon Jul 27, 2020 11:43 pm
by n8thenetninja » Mon Jul 27, 2020 11:43 pm
So, apparently it's not the cam sensor. *dramatic sigh...*
Not sure where to go from here. Considering taking it apart, installing a stock pan, then running it on jack stands for a while to see if it leaks. No idea when I'd have time for an experiment like that. Or there's always dropping the transmission to check the rear cover. Even more fun.

-
n8thenetninja - Posts: 78
- Joined: Fri Oct 30, 2015 6:56 pm
1975 Chevrolet Vega Hatchback
Re: Aftermarket LS Oil pan?
![]() by AZ-520 » Tue Jul 28, 2020 9:58 am
by AZ-520 » Tue Jul 28, 2020 9:58 am
- AZ-520
- Posts: 18
- Joined: Thu Feb 21, 2019 9:40 am
Re: Aftermarket LS Oil pan?
![]() by n8thenetninja » Wed Aug 12, 2020 12:14 am
by n8thenetninja » Wed Aug 12, 2020 12:14 am
This is the rear passenger side of the pan when a straight edge is held against the front
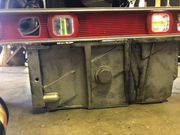
Here's the front when the straight edge is held against the rear

About as straight as a dog's hind leg.
Here you can see a melted spot where the header tube didn't clear the pan enough
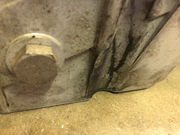
I'm guessing that the pan had stress points built into it by the welding heat during modification, and then the header tube heat cycled it over and over, and the warping just got worse and worse. Not cool ACE. (so to speak)
I dug my old steel Hamburger pan out of the scrap pile, the one I mentioned earlier in this thread that I bashed in with a hammer to make it clear, and had a seam pop along the rear eventually... I welded up the popped seam, then banged on it until it was as flat as I could make it. I installed it with a new Felpro gasket and a bead of RTV, and after about 45 minutes of idling, it seems to be sealed up. I'll have to see how it does driving it, but on jack stands at least, this abused and repaired steel pan seals better than the pan I paid ACE $600 for. The one that never sealed right, and was further aggravated by the headers I paid ACE $780 for.
Seems I've paid ACE a lot of money for a lot of grief. $1380 between those two parts that are supposedly made to work with each other. Can't say I would recommend their work.
-
n8thenetninja - Posts: 78
- Joined: Fri Oct 30, 2015 6:56 pm
1975 Chevrolet Vega Hatchback
Re: Aftermarket LS Oil pan?
![]() by BadBowtie » Wed Aug 12, 2020 11:07 am
by BadBowtie » Wed Aug 12, 2020 11:07 am
1975 Vega GT sbc, Microsquirt w/Edelbrock MPFI, M21 4-speed and Ford 9"
-

BadBowtie - Posts: 846
- Joined: Wed Oct 28, 2009 12:20 am
1975 Chevrolet Vega GT
Re: Aftermarket LS Oil pan?
![]() by monzaaddict » Wed Aug 12, 2020 1:34 pm
by monzaaddict » Wed Aug 12, 2020 1:34 pm
- monzaaddict
- Posts: 2600
- Joined: Sun Jul 02, 2006 3:04 pm
Re: Aftermarket LS Oil pan?
![]() by monzaaddict » Wed Aug 12, 2020 2:16 pm
by monzaaddict » Wed Aug 12, 2020 2:16 pm
- monzaaddict
- Posts: 2600
- Joined: Sun Jul 02, 2006 3:04 pm
Re: Aftermarket LS Oil pan?
![]() by monzaaddict » Thu Aug 13, 2020 2:51 am
by monzaaddict » Thu Aug 13, 2020 2:51 am
Important:
◦ The alignment of the structural oil pan is critical. The rear bolt hole locations
of the oil pan provide mounting points for the transmission housing. To
ensure the rigidity of the powertrain and correct transmission alignment, it is
important that the rear of the block and the rear of the oil pan are flush, or
even. The rear of the oil pan must NEVER protrude beyond the engine block
and transmission housing plane.
◦ Do not use the oil pan gasket again.
◦ It is not necessary to rivet the NEW gasket to the oil pan.
1. Apply a 5 mm (0.2 in) bead of sealant GM P/N 12378521 (Canadian P/N 88901148), or
equivalent, 20 mm (0.8 in) long to the engine block. Apply the sealant directly onto the tabs
of the front cover gasket that protrude into the oil pan surface. Refer to Adhesives, Fluids,
Lubricants, and Sealers.
2. Apply a 5 mm (0.2 in) bead of sealant GM P/N 12378521 (Canadian P/N 88901148), or
equivalent, 20 mm (0.8 in) long to the engine block. Apply the sealant directly onto the tabs
of the rear cover gasket that protrude into the oil pan surface.
Important: Ensure the oil gallery passages in the oil pan and engine block properly align
with the oil pan gasket.
3. Pre-assemble the oil pan gasket to the pan.
3.1. Install the gasket onto the oil pan.
3.2. Install the oil pan bolts (439, 453) to the pan and through the gasket.
4. Install the oil pan (400), gasket and bolts to the engine block.
5. Tighten bolts finger tight. Do not overtighten.6. Place a straight edge across the rear of the engine block and the rear of the oil pan at the
transmission housing mounting surfaces.
Notice: Refer to Fastener Notice.
7. Align the oil pan until the rear of engine block and rear of oil pan are flush or even.
Tighten
Tighten the oil pan-to-block and oil pan-to-front cover bolts to 25 ◦ (18 lb ft).
Tighten the oil pan-to-rear cover bolts to 12 ◦ (106 lb in).
8. Measure the oil pan-to-engine block alignment (a).
8.1. Place a straight edge across the rear of the engine block and rear of oil pan at the
transmission housing mounting surfaces.
Important: The rear of the oil pan must NEVER protrude beyond the engine block and
transmission housing mounting surfaces.
8.2. Insert a feeler gauge between the straight edge and the oil pan transmission housing
mounting surface, and inspect to ensure there is no greater than a 0.1 mm (0.004 in)
gap (a) between the pan and straight edge.
8.3. If the oil pan alignment is not within specifications, remove the oil pan and repeat the
above procedure.
- monzaaddict
- Posts: 2600
- Joined: Sun Jul 02, 2006 3:04 pm
Re: Aftermarket LS Oil pan?
![]() by monzaaddict » Sat Aug 15, 2020 1:54 pm
by monzaaddict » Sat Aug 15, 2020 1:54 pm
- monzaaddict
- Posts: 2600
- Joined: Sun Jul 02, 2006 3:04 pm
Re: Aftermarket LS Oil pan?
![]() by monzaaddict » Sat Aug 15, 2020 2:02 pm
by monzaaddict » Sat Aug 15, 2020 2:02 pm
- monzaaddict
- Posts: 2600
- Joined: Sun Jul 02, 2006 3:04 pm
Re: Aftermarket LS Oil pan?
![]() by n8thenetninja » Mon Aug 17, 2020 1:13 pm
by n8thenetninja » Mon Aug 17, 2020 1:13 pm
When the car is driven for a few minutes, oil pressure gradually goes down and down, and pressure degreases with RPM. It got down to 10PSI by the time I got back home. After the engine was cooled off, pressure went back up to 40 at idle. The hamburger pickup tube has holes for 2 bolts instead of one, but I couldn't get the second one started because it hit the front cover. I figured maybe I used the wrong o-ring, and needed to add that second bolt. So I took the pan off again, used a different o-ring, and managed to get a shorter bolt in the second hole. Put it all back together the same way and waited until the next day so the RTV could cure. Still has the exact same problem.
I still think the pickup tube is sucking in bubbles. This would explain why pressure would gradually decrease as the oil gets aerated, and why pressure would go down with RPM. This tube has a very short length after the mounting flange that goes into the pump, and the o-ring sits quite a bit closer to the flange than the other pickup tube. My guess is that it's just not getting the o-ring past the bevel in the pump. Or maybe there's a pinhole or a crack in the tube that I can't see.To answer your questions, yes, I have the ACE pickup tube. It's too short to fit in the hamburger pan unfortunately. I did clearance the windage tray for the tube. I haven't measured the tube, but there aren't any witness marks on it that would indicate that the pan is touching it. My transmission bell housing doesn't have the lower bolts that go to the pan, so that also isn't coming into the equation.
I've considered taking the ACE pan to a machine shop to see if they can fix it. I'm getting a little hesitant to spend any more money on it though. I haven't talked to ACE yet, but I don't think I'd trust him to do anything other than send me a refund, and I doubt he'll do that. The welds do look better on this one than the first one he sent me. I would wonder if he sent me back the same one otherwise, since it leaks in the same place.
I think the best long term solution is probably to get a tubular k-member with a rack and pinion from Overkill Racecars. That's supposed to give you at least another inch to play with. That would allow me to fit an unmodified pan in there. That's expensive though, and I won't be able to do it right away. There's a possibility the headers won't fit too, which would be another expensive problem to solve.
The smartest thing to do might be to park it until I can afford better parts.
-
n8thenetninja - Posts: 78
- Joined: Fri Oct 30, 2015 6:56 pm
1975 Chevrolet Vega Hatchback
Re: Aftermarket LS Oil pan?
![]() by n8thenetninja » Mon Aug 17, 2020 6:39 pm
by n8thenetninja » Mon Aug 17, 2020 6:39 pm
Fingers crossed!
-
n8thenetninja - Posts: 78
- Joined: Fri Oct 30, 2015 6:56 pm
1975 Chevrolet Vega Hatchback
Re: Aftermarket LS Oil pan?
![]() by monzaaddict » Tue Aug 18, 2020 12:43 pm
by monzaaddict » Tue Aug 18, 2020 12:43 pm
- monzaaddict
- Posts: 2600
- Joined: Sun Jul 02, 2006 3:04 pm
Who is online
Users browsing this forum: No registered users and 4 guests