The Official H-Body Internet Community
Vega, Monza, Sunbird, Astre, Starfire, Skyhawk
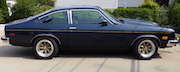
zeke's Monza
Moderator: Moderators
Re: zeke's Monza
![]() by zeke » Tue Sep 29, 2020 11:15 pm
by zeke » Tue Sep 29, 2020 11:15 pm
.
You do not have the required permissions to view the files attached to this post.
Chris
zeke's 79 Monza Project
zeke's 78 Sport Coupe
Photographs posted by this user (zeke) are the sole property of this poster. Any use without express written permission is prohibited
zeke's 79 Monza Project
zeke's 78 Sport Coupe
Photographs posted by this user (zeke) are the sole property of this poster. Any use without express written permission is prohibited
-

zeke - Posts: 2930
- Joined: Fri Jul 21, 2006 3:27 am
- Location: Southern Ontario, Canada
1979 Chevrolet Monza 2+2
Re: zeke's Monza
![]() by zeke » Tue Sep 29, 2020 11:18 pm
by zeke » Tue Sep 29, 2020 11:18 pm
New sender is slightly higher but just clears floor. I added ~2 gallons before float moved - it has a reserve.
You do not have the required permissions to view the files attached to this post.
Chris
zeke's 79 Monza Project
zeke's 78 Sport Coupe
Photographs posted by this user (zeke) are the sole property of this poster. Any use without express written permission is prohibited
zeke's 79 Monza Project
zeke's 78 Sport Coupe
Photographs posted by this user (zeke) are the sole property of this poster. Any use without express written permission is prohibited
-
zeke - Posts: 2930
- Joined: Fri Jul 21, 2006 3:27 am
- Location: Southern Ontario, Canada
1979 Chevrolet Monza 2+2
Re: zeke's Monza
![]() by zeke » Wed Sep 30, 2020 7:46 am
by zeke » Wed Sep 30, 2020 7:46 am
A lot of the charcoal leaked out the bottom of the vapor canister. New Dorman replacement on the way. Refurbished the engine compartment vent line.
You do not have the required permissions to view the files attached to this post.
Chris
zeke's 79 Monza Project
zeke's 78 Sport Coupe
Photographs posted by this user (zeke) are the sole property of this poster. Any use without express written permission is prohibited
zeke's 79 Monza Project
zeke's 78 Sport Coupe
Photographs posted by this user (zeke) are the sole property of this poster. Any use without express written permission is prohibited
-
zeke - Posts: 2930
- Joined: Fri Jul 21, 2006 3:27 am
- Location: Southern Ontario, Canada
1979 Chevrolet Monza 2+2
Re: zeke's Monza
![]() by zeke » Thu Oct 01, 2020 6:36 am
by zeke » Thu Oct 01, 2020 6:36 am
The vent has been moved to the top on the Dorman replacement and has no bowl vent connection or purge control valve - perfect. Got to reuse the mounting tabs from old cannister
You do not have the required permissions to view the files attached to this post.
Chris
zeke's 79 Monza Project
zeke's 78 Sport Coupe
Photographs posted by this user (zeke) are the sole property of this poster. Any use without express written permission is prohibited
zeke's 79 Monza Project
zeke's 78 Sport Coupe
Photographs posted by this user (zeke) are the sole property of this poster. Any use without express written permission is prohibited
-
zeke - Posts: 2930
- Joined: Fri Jul 21, 2006 3:27 am
- Location: Southern Ontario, Canada
1979 Chevrolet Monza 2+2
Re: zeke's Monza
![]() by zeke » Sun Oct 04, 2020 3:31 am
by zeke » Sun Oct 04, 2020 3:31 am
Used some 10/32 nuts to shim the filler neck back from the quarter panel a bit and finally painted the reproduction cap.
You do not have the required permissions to view the files attached to this post.
Chris
zeke's 79 Monza Project
zeke's 78 Sport Coupe
Photographs posted by this user (zeke) are the sole property of this poster. Any use without express written permission is prohibited
zeke's 79 Monza Project
zeke's 78 Sport Coupe
Photographs posted by this user (zeke) are the sole property of this poster. Any use without express written permission is prohibited
-
zeke - Posts: 2930
- Joined: Fri Jul 21, 2006 3:27 am
- Location: Southern Ontario, Canada
1979 Chevrolet Monza 2+2
Re: zeke's Monza
![]() by zeke » Wed Oct 07, 2020 11:19 pm
by zeke » Wed Oct 07, 2020 11:19 pm
Brand new switch - not canceling after left turn. The cancel cam was lightly worn so replaced it. Still wouldn't cancel after left turn so I put the left spring from the old switch back in - works. New spring must be slightly undersized 
I've had GM columns apart dozens of times but never seen that one before. On the bright side, I'm now an expert at digging out the clip
  Side note; If you dislodge the upper shaft and caged bearing, you'll need to find all 14 balls.
I've had GM columns apart dozens of times but never seen that one before.
On the bright side, I'm now an expert at digging out the clip You do not have the required permissions to view the files attached to this post.
Chris
zeke's 79 Monza Project
zeke's 78 Sport Coupe
Photographs posted by this user (zeke) are the sole property of this poster. Any use without express written permission is prohibited
zeke's 79 Monza Project
zeke's 78 Sport Coupe
Photographs posted by this user (zeke) are the sole property of this poster. Any use without express written permission is prohibited
-
zeke - Posts: 2930
- Joined: Fri Jul 21, 2006 3:27 am
- Location: Southern Ontario, Canada
1979 Chevrolet Monza 2+2
Re: zeke's Monza
![]() by zeke » Sat Oct 10, 2020 8:14 am
by zeke » Sat Oct 10, 2020 8:14 am
Old meme that circulates on FB, slightly modified 
Had the car out again, no more pressurized fuel tank. Alternator started charging intermittently so that's next. One on the car is just a bunch of used parts I put together.
Had the car out again, no more pressurized fuel tank.
Alternator started charging intermittently so that's next. One on the car is just a bunch of used parts I put together.You do not have the required permissions to view the files attached to this post.
Chris
zeke's 79 Monza Project
zeke's 78 Sport Coupe
Photographs posted by this user (zeke) are the sole property of this poster. Any use without express written permission is prohibited
zeke's 79 Monza Project
zeke's 78 Sport Coupe
Photographs posted by this user (zeke) are the sole property of this poster. Any use without express written permission is prohibited
-
zeke - Posts: 2930
- Joined: Fri Jul 21, 2006 3:27 am
- Location: Southern Ontario, Canada
1979 Chevrolet Monza 2+2
Re: zeke's Monza
![]() by hammerdown7 » Sat Oct 10, 2020 9:12 am
by hammerdown7 » Sat Oct 10, 2020 9:12 am
Chris, after all you work I would leave a lot more space between the Monza and the rest of the world.
Dick
Dick
-
hammerdown7 - Posts: 3805
- Joined: Mon Jun 26, 2006 7:53 pm
- Location: Clawson, MI
1976 Chevrolet Vega Cosworth
Re: zeke's Monza
![]() by zeke » Mon Oct 19, 2020 6:26 am
by zeke » Mon Oct 19, 2020 6:26 am
After the car gets re-painted, I will take more care parking.
Major dissassembly required to R&R the "trapped" alternator so making a bunch of small changes. Part of building a custom car.
Major dissassembly required to R&R the "trapped" alternator so making a bunch of small changes. Part of building a custom car.
You do not have the required permissions to view the files attached to this post.
Chris
zeke's 79 Monza Project
zeke's 78 Sport Coupe
Photographs posted by this user (zeke) are the sole property of this poster. Any use without express written permission is prohibited
zeke's 79 Monza Project
zeke's 78 Sport Coupe
Photographs posted by this user (zeke) are the sole property of this poster. Any use without express written permission is prohibited
-
zeke - Posts: 2930
- Joined: Fri Jul 21, 2006 3:27 am
- Location: Southern Ontario, Canada
1979 Chevrolet Monza 2+2
Re: zeke's Monza
![]() by dindin » Mon Oct 19, 2020 10:35 am
by dindin » Mon Oct 19, 2020 10:35 am
Slow down you are making us all look like slackers..
Looks great
Looks great
- dindin
- Posts: 550
- Joined: Wed May 21, 2014 10:01 am
Re: zeke's Monza
![]() by zeke » Sun Oct 25, 2020 6:20 pm
by zeke » Sun Oct 25, 2020 6:20 pm
Thanks Al, sry, was getting a back log here lol
Years ago, my theme for this car changed from racecar to street cruiser with a factory look. I really wanted to run a serpentine belt and use the front accessory bracket from a 91 Caprice I scrapped. It housed an R4 A/C compressor and an air pump. I really don't care for the alternator on the center of the engine and decided this bracket had to made to work with the alternator mounted in place of the smog pump. That led to 3 dozen other major problems but I dealt with them all. I knew there would be more conflicts to solve when it came time to change the alternator and I found them.
I made an extra idler mounted on the alt. pivot bolt for more belt wrap but this turned out to be a bad idea as it was a half inch too long to remove without pulling the radiator. My aluminum rad is mounted on the other side of the core now (to gain the room for the long water pump) and would require dissassembling most of the front clip. Hacksaw the bolt I did. I hated the idler anyways, looked crappy and non factory. After looking at some other OE belt setups, I decided I didn't really need it.
Next issue - how to get alternator out. Only way is up the front side of compressor and clutch is in the way. OK, no problem, unbolt A/C comp. Well the mounting bolts come in from the rear and top one won't come out because of the tall valve cover. Remove valve cover next. Wait, can't because of refrigerant hose! DOH Undo A/C manifold from compressor.
But wait, there's more!
Alternator will not slide up and out with the Spal fans in the way. Ok, no problem, fans have to come out except can't with rad hose hooked up - drain coolant. Arggghhhh!
Obviously, this situation would be a disaster a 1000 miles from home and generally sucks so changes needed to be made.
I drilled the threads out of the upper comp bolt bracket and bought a 5.5" x 3/8"- 16 bolt to install from the front. Also bought a 6" 3/8" - 16 bolt to replace the pivot one that I cut out. Now the compressor can be unbolted without disconnecting refrigerant lines or removing valve cover. It sits off to the side nicely on the vapor canister.
The dual 11" Spal fan is actually two fans riveted together. I had to separate them so they can be installed in the car without disconnecting the rad hose. The passenger side fan goes in first and slides over in front of A/C compressor. The drivers side fan drops in after. Same 3 bolts as before hold it in place.
The alternator is sold by Powermaster, it's a Delco CS130 with some mods. These were great GM alternators when they came out ~1986 but the rear bearings were undersized and failed prematurely. That was corrected with a wider bearing and a different plastic bearing insulator. Precision machining of the rotor and stator lam stack results in low air gap > increased magnetic field induction into stator windings > increased output. In stock configuration, a CS130 will do ~45 amps at idle and 100+ spinning fast
For high current applications, the aftermarket rectifier makers came up with a HD version with pressed in 10 mm diodes. The slip ring end casting is also cast much thicker in the rectifier area for additional heat sinking. The rotor coil is wound to draw more current for a larger magnetic field > more output. The regulators have a HD transistor to handle the increased field current. I don't care about brand names of resellers, I care about what's inside. All new parts and a self exciting regulator for one wire operation (increased reliability). I chose one that is powder coated black, chrome just holds heat into the case. Had to re-clock it of course and put a smaller CS121 fan on it to fit in my smog pump location.
So the alternator R&R book time has dropped from 2 days to two hours at most.
I spent 3 hours making filler pieces for the rad to cradle area so that the fan draws thru the rad instead of around it. Had to shorten a drill bit to make the four mounting holes.
I couldn't get the upper rad hose gear clamp off either, without removing the top plate. While I was in there, I silconed a piece of DVD box material to the top of the rad as I didn't like seeing the shiny aluminium rad thru the hood latch assy when the hood was up.
While I had the car in the air to remove the bracket lower bolts, I noticed that the fancy one piece Fel-Pro oil pan gasket was leaking badly at the timing cover. Hit it with brake clean, compressed air and packed it with the Right Stuff. Problem solved.
I installed a brand new A/C compressor and hose assy for a 91 Caprice, FOUR SEASONS 58948 comp. and FOUR SEASONS 55455 hose. The accumulator for 91 won't work but 1990 Caprice will, FOUR SEASONS 33187 except one service port is on the back side. I ordered a right angle adapter from Amazon to fix that issue. It won't be left on the car tho as it would just be one more possible leak point.
Best to drain out the oil that comes with the comp. and add your own quality stuff. ~3 ounces in compressor low side port and the other 5 in the suction line. As the hose won't lift up high enough, I had to use a couple small "nudges" of compressed air to move the oil up into the accumulator. I immediately vacuumed the system after connecting the manifold up.
I need some more refrigerant to finish the A/C and am hooking up the generator dash light to the alternator yet. Alternator starts and charges right away without giving engine any throttle in one wire config. I have a voltmeter but may as well have the light fuction working also as it's there in the dash.
You do not have the required permissions to view the files attached to this post.
Chris
zeke's 79 Monza Project
zeke's 78 Sport Coupe
Photographs posted by this user (zeke) are the sole property of this poster. Any use without express written permission is prohibited
zeke's 79 Monza Project
zeke's 78 Sport Coupe
Photographs posted by this user (zeke) are the sole property of this poster. Any use without express written permission is prohibited
-
zeke - Posts: 2930
- Joined: Fri Jul 21, 2006 3:27 am
- Location: Southern Ontario, Canada
1979 Chevrolet Monza 2+2
Re: zeke's Monza
![]() by zeke » Sun Oct 25, 2020 6:22 pm
by zeke » Sun Oct 25, 2020 6:22 pm
.
You do not have the required permissions to view the files attached to this post.
Chris
zeke's 79 Monza Project
zeke's 78 Sport Coupe
Photographs posted by this user (zeke) are the sole property of this poster. Any use without express written permission is prohibited
zeke's 79 Monza Project
zeke's 78 Sport Coupe
Photographs posted by this user (zeke) are the sole property of this poster. Any use without express written permission is prohibited
-
zeke - Posts: 2930
- Joined: Fri Jul 21, 2006 3:27 am
- Location: Southern Ontario, Canada
1979 Chevrolet Monza 2+2
Re: zeke's Monza
![]() by zeke » Sun Oct 25, 2020 6:25 pm
by zeke » Sun Oct 25, 2020 6:25 pm
.
You do not have the required permissions to view the files attached to this post.
Chris
zeke's 79 Monza Project
zeke's 78 Sport Coupe
Photographs posted by this user (zeke) are the sole property of this poster. Any use without express written permission is prohibited
zeke's 79 Monza Project
zeke's 78 Sport Coupe
Photographs posted by this user (zeke) are the sole property of this poster. Any use without express written permission is prohibited
-
zeke - Posts: 2930
- Joined: Fri Jul 21, 2006 3:27 am
- Location: Southern Ontario, Canada
1979 Chevrolet Monza 2+2
Re: zeke's Monza
![]() by zeke » Sun Oct 25, 2020 6:28 pm
by zeke » Sun Oct 25, 2020 6:28 pm
.
You do not have the required permissions to view the files attached to this post.
Chris
zeke's 79 Monza Project
zeke's 78 Sport Coupe
Photographs posted by this user (zeke) are the sole property of this poster. Any use without express written permission is prohibited
zeke's 79 Monza Project
zeke's 78 Sport Coupe
Photographs posted by this user (zeke) are the sole property of this poster. Any use without express written permission is prohibited
-
zeke - Posts: 2930
- Joined: Fri Jul 21, 2006 3:27 am
- Location: Southern Ontario, Canada
1979 Chevrolet Monza 2+2
Re: zeke's Monza
![]() by zeke » Sun Oct 25, 2020 6:31 pm
by zeke » Sun Oct 25, 2020 6:31 pm
.
You do not have the required permissions to view the files attached to this post.
Chris
zeke's 79 Monza Project
zeke's 78 Sport Coupe
Photographs posted by this user (zeke) are the sole property of this poster. Any use without express written permission is prohibited
zeke's 79 Monza Project
zeke's 78 Sport Coupe
Photographs posted by this user (zeke) are the sole property of this poster. Any use without express written permission is prohibited
-
zeke - Posts: 2930
- Joined: Fri Jul 21, 2006 3:27 am
- Location: Southern Ontario, Canada
1979 Chevrolet Monza 2+2
Who is online
Users browsing this forum: No registered users and 4 guests