The Official H-Body Internet Community
Vega, Monza, Sunbird, Astre, Starfire, Skyhawk
Restoration of Mirage in progress
Moderator: Moderators
13 posts
• Page 1 of 1
Restoration of Mirage in progress
![]() by spyderhunter » Sun Mar 13, 2011 7:40 pm
by spyderhunter » Sun Mar 13, 2011 7:40 pm
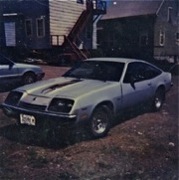
Hi everyone, I recently bought Dan Boardman's Mirage from Arizona and shipped it to Maine. Man, shipping isn't cheap these days, but I couldn't go get it for what they charge. Anyways, I started stripping it down yesterday and today. I've always wanted to restore an old car.( A 66 Impala was my other choice, but the guy thought it was made of gold or something.) Was looking for a Spyder but found this. Every bolt and screw started with an opened end wrench or a 3/8 ratchet by hand. I've never seen such a thing up here in Maine. Hell, stainless will rust up here if you give it a week or so! I don't have air tools yet, but the nose is off, the motor and tranny out, exhaust and gas tank out, interior pretty much stripped, and some of the trim. Even pulled a few dents and straightened one of the rockers. I am not as young as I used to be, and I'm exhausted. Hated to quit,but just staring at the car wasn't doing anything, so I gave up about 4pm. Hope I can keep going on this, but I'm sure the project will slow down quickly when more money is needed. Will post pics as soon as I get them small enough to fit in here.
Last edited by spyderhunter on Sun Apr 10, 2011 5:46 pm, edited 1 time in total.
-
spyderhunter - Posts: 158
- Joined: Fri Feb 11, 2011 5:50 pm
- Location: Bucksport, Maine
Re: Restore 77 Mirage
![]() by spyderhunter » Tue Apr 05, 2011 9:06 pm
by spyderhunter » Tue Apr 05, 2011 9:06 pm
Finally figured how to post a few pics of the project. Will post some more of the progress that's been done.[attachment=0
You do not have the required permissions to view the files attached to this post.
-
spyderhunter - Posts: 158
- Joined: Fri Feb 11, 2011 5:50 pm
- Location: Bucksport, Maine
Re: Restore 77 Mirage
![]() by spyderhunter » Tue Apr 05, 2011 10:02 pm
by spyderhunter » Tue Apr 05, 2011 10:02 pm
Here's a few more pics before I got started.
You do not have the required permissions to view the files attached to this post.
-
spyderhunter - Posts: 158
- Joined: Fri Feb 11, 2011 5:50 pm
- Location: Bucksport, Maine
Re: Restoration of Mirage in progress
![]() by spyderhunter » Fri Apr 22, 2011 8:54 pm
by spyderhunter » Fri Apr 22, 2011 8:54 pm
Here are a few more pics of the progress.
You do not have the required permissions to view the files attached to this post.
-
spyderhunter - Posts: 158
- Joined: Fri Feb 11, 2011 5:50 pm
- Location: Bucksport, Maine
More pics of Mirage project
![]() by spyderhunter » Wed Apr 27, 2011 2:51 am
by spyderhunter » Wed Apr 27, 2011 2:51 am
Finally getting to some mud work and primer. It's kind of a shame to put a skim coat of mud over the whole car, considering it had only a little in some door dings, but there were a bunch of little dents and then there's always the little imperfections from the factory. The roof and hood needed some to fill the grinding scratches where I really gave it a working over. After I cut out and weld in new patches over the couple rust holes and straighten the rockers and the dent in the left rear quarter, I'll have the most of the body work done. I'm in hopes of getting it onto the frame machine to assist in pulling those rockers down some. I tried it manually, but it needs more pull than I have. They don't look that bad from these angles, but I'll post some close ups when the work starts. I've never restored anything before so if you have any criticism or experience I am willing to listen!
You do not have the required permissions to view the files attached to this post.
-
spyderhunter - Posts: 158
- Joined: Fri Feb 11, 2011 5:50 pm
- Location: Bucksport, Maine
Re: Restoration of Mirage in progress
![]() by BadBowtie » Wed Apr 27, 2011 10:47 am
by BadBowtie » Wed Apr 27, 2011 10:47 am
Looking good! Seems like a solid project, what are your plans for paint?
James
1975 Vega GT sbc, Microsquirt w/Edelbrock MPFI, M21 4-speed and Ford 9"
1975 Vega GT sbc, Microsquirt w/Edelbrock MPFI, M21 4-speed and Ford 9"
-

BadBowtie - Posts: 846
- Joined: Wed Oct 28, 2009 12:20 am
1975 Chevrolet Vega GT
Re: Restoration of Mirage in progress
![]() by gerbsinmd » Wed Apr 27, 2011 11:14 am
by gerbsinmd » Wed Apr 27, 2011 11:14 am
looking good, mine looked like that a while ago. Its much better now 
1999 Saturn SL2
2017 Cruze Hatchback
2008 Town & Country - Family transport
2018 Cruze - 35mpg - avg, 49.7mpg - best so far.
2011 Impala - commuter
RIP-2002 Saturn SL2 Commuter car - burned a valve @ 234k miles
1977 Monza Mirage being Restified!!
2017 Cruze Hatchback
2008 Town & Country - Family transport
2018 Cruze - 35mpg - avg, 49.7mpg - best so far.
2011 Impala - commuter
RIP-2002 Saturn SL2 Commuter car - burned a valve @ 234k miles
1977 Monza Mirage being Restified!!
-

gerbsinmd - Posts: 2062
- Joined: Mon Jun 26, 2006 2:48 pm
- Location: Dunkirk, MD
1977 Chevrolet Monza Mirage
Re: Restoration of Mirage in progress
![]() by spyderhunter » Wed Apr 27, 2011 4:45 pm
by spyderhunter » Wed Apr 27, 2011 4:45 pm
I'm going to keep it original looking. White with the stripes. PPG basecoat and clear. Although I think I might paint all the stripes and bury them in the clear. I know some think the vinyl stripes are more the era, but they didn't use basecoat/clearcoat then either. And it looks better and lasts a lot longer. I finished a couple repairs early this morning (3:30am....couldn't sleep), and put some more primer on today. Also took out the rest of the dash, but I'm hesitant about the wiring and heater unit and stuff. I plan to do everything under the hood also, so I know it should all come out. It's kind of overwhelming when you see the car down to it's shell, knowing you have to put all back someday! Thanks for the encouragement, maybe we'll meet at the finals in a car show someday!
-
spyderhunter - Posts: 158
- Joined: Fri Feb 11, 2011 5:50 pm
- Location: Bucksport, Maine
Re: Restoration of Mirage in progress
![]() by spyderhunter » Wed May 25, 2011 10:17 pm
by spyderhunter » Wed May 25, 2011 10:17 pm
Here are a few updated pics of the rear quarters. Pulled and pounded the dents out of the drivers side and got it pretty good before putting a few finish coats of mud on. The passengers side only had a couple small dents, but where the holes were drilled for the mounting strips, there were small indentations and a few slight dips in the factory metal. Some epoxy primer is next on the repairs just to make me feel better for now. I know I should have welded the holes in the bottom of the quarter first, but since I don't have a welder, that will be the next step when I borrow one.
You do not have the required permissions to view the files attached to this post.
-
spyderhunter - Posts: 158
- Joined: Fri Feb 11, 2011 5:50 pm
- Location: Bucksport, Maine
Re: Restoration of Mirage in progress
![]() by cjbiagi » Wed May 25, 2011 10:24 pm
by cjbiagi » Wed May 25, 2011 10:24 pm
Looking good, 
Clyde.........75 Monza 2+2
-

cjbiagi - Posts: 8612
- Joined: Sun Jun 25, 2006 2:37 pm
- Location: Glenwood, Illinois
1975 Chevrolet Monza
Re: Restoration of Mirage in progress
![]() by spyderhunter » Wed Jun 15, 2011 9:55 pm
by spyderhunter » Wed Jun 15, 2011 9:55 pm
Here's a few pics of the quarters with some primer on them. Still need to do some welding to repair right quarter and small hole in right door on bottom front. Also have the rockers about ready for primer. They were real solid but dented pretty good under and some on the sides also. Bought some parts from Motionwannabe. Seats mainly and a few other odds and ends. Anyone coming from Pa. to Maine? Or part way? I am not in a big hurry to get the parts, but if anyone is traveling and has room I'd be glad to throw some gas money at you to help with your trip. I'm right on the way to Bar Harbor (Acadia National Park) which is a popular travel destination on the coast.
You do not have the required permissions to view the files attached to this post.
-
spyderhunter - Posts: 158
- Joined: Fri Feb 11, 2011 5:50 pm
- Location: Bucksport, Maine
Re: Restoration of Mirage in progress
![]() by spyderhunter » Sun Jul 17, 2011 9:06 pm
by spyderhunter » Sun Jul 17, 2011 9:06 pm
Been doing a little sandblasting on some areas of the car to clean things up some. Around the windshield and rear window there was some scale and a little pitting along with some real light rust in front of the doors around the hinges. Figured I'd clean the paint off the rockers and got some under the hood done. Tried the crushed walnut shells and in my opinion it's not worth the time in comparison to sand. I blasted an area on the underside of the hood and it still warped that spot.(I thought that is why you use the stuff!) So I have to fix that spot again. Oh well, I'll get some primer on these spots and move on. Getting a list of parts together that I've found and hopefully I'll be getting some of them soon. Will post some pics tomorrow.
-
spyderhunter - Posts: 158
- Joined: Fri Feb 11, 2011 5:50 pm
- Location: Bucksport, Maine
13 posts
• Page 1 of 1
Who is online
Users browsing this forum: No registered users and 102 guests