eventually using plastic pop in body panel fasteners to hold it in place.
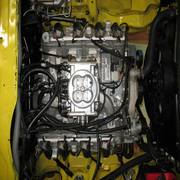
A look under neath at more carving of the bottom of fan shroud
Modifying the filler panel-valance bracket.
Radiator runs into it on bottom as well as top.Decided to trim out bottom a little and to pie slice part of the mid bracket,cut and remove some from the top,bend it forward and weld it.
Picked out a water pump from a new LS take off,Ebay.It's part #12604630 running Corvette belt line.
Clearance is good so far,even with the stock 45 degree thermostat housing.
Slipped in the electric fan and the top hose outlet is a might close.
Took some off to the second ring.
Mocking up some hose sizes.
Doesn't need much for hoses.1 1/4 S shape and 1 1/2 45 degree on bottom.
Went on a hose safari at O'Reillys.
Here is what I ended up with.All Gates #s.
I think this will work for a by pass hose with a stretch on one end.
Well,after a lot of poking around on the old internet I have made a decision on the bracket and belt locations I am going to to use. First what I here is the alternator of choice if you are on budget and need good service from your charging system is the 145 amp AD244 case.
I am going to power an electric fuel pump,dual speed electric fan,eight coils on the ls ,stereo,and that is just the start of the list.This alt. does well at idle,maybe 100 amps and is reasonably priced.A Remy 91653 for a Buick Rainier or I chose a Tuff Stuff #8237.I am looking to mount it low and found out it will fit on either the driver or pass side on this Vega.There are many brackets out there for this also many High Prices so of course I'm building my own(again).Using the the 4 grove air cond. part of the damper pulley as some have been using and running the 6 grove belt just for the water pump.The 4 groove is a slightly smaller diameter the the 6 and had to search for a 4 groove alt. pulley that was also a smaller diameter to match better.Here is where I found one. http://www.ombwarehouse.com/Pulley-4-Groove.html It is a replacement for Delco #1987648 which has been discontinued.
Taking 6 groove off and replacing with smaller diameter 4 groove.
Made up an initial bracket that will get 2 tabs welded on for the alt. to swing on.Will then come off of the upper bolt holes on the block with some grooved brackets for adjustment.
And did not spend 2K but started out with some flat metal and $5.00 trailer spring bracket.
Although I had a 1" shaft machined and tapped at a shop for $30
to fit Gates #38008 adjuster wheel to
Measured and drilled a plate and bolted to head with some spacers behind
Drilled 1" hole in bracket,found ideal spot to clear rad upper rad hose and welded on to plate
Got measurement from block to center of crank lower pulley and center top pulley wheel
Tacked and welded together
Turned to lower Alt brackets.Had 1" plate formed at work 2" ID I believe to fit the alt. bottom boss
Drilled and contoured to fit with 7/16" bolt.Had to bore the alt. bosses for that size also
Tight fit actually
Measured out once again from pulley and also top of alt bracket distance
Removed part of flat boss on block and mounted angle to the bosses for upper mount
Need some adjustment on top bracket though new it would have to minimal and this alt. not being 90 degree mount swings down but so made tabs first from cardboard.Did this with the alt. mounted and swinging from the lower bracket.
Tacked two plates together for identical pcs.
Definitely played with this awhile but got it to work.Tacked together
Brackets on and belt size was some what of a pain so grandma at K-Mart helped with a seamstress tape
After a lot of buys and tries finally came up with Daycos, they seem to have more incremental sizes.Have about 1" or so adj. on alt so got tight belt to start with.Works so far.
VegaBee that looks like a real good answer to your belt "situation" I would say that those turned out real nice! If they pass the torture test you could make them up out of aluminum and polish them up and they would easily pass for March, or any of the big name companies products. Nice touch with the spring hanger! Harry
I'm not a hoarder I'm a preservationist 78 Monza Spyder (~Soon(ish +/- I guess) To Be 2+2 with Spoilers)
Thanks guys.Water pump comes right off with brackets on even.Wanted the alt. where it can get air keeping it cooler.I also wanted to be able to replace the tensioner/pulley wheels with readily avail. parts store pcs.,thats why I had a idler shaft made for the same pulleys.Have good Wrap around water pump and crank.Did go with steel for brackets but they can't really weigh much more or as much as some of those humungo aluminum OEM ones.
Winter finally over in Wis so back to it on the Vega.For the life of me I could not fit a reg trans cooler in the front of the car the way I wanted so looked for a slimmer model to try.I found a slick cooler with rad fins like a narrow radiator from Kia Sedona van
It's long at 27.5" tab to tab
Drilled ends larger.After moving the cooler position every which way I decided to put it through the center of the front grill support bracket and attach each end to the bumper mounting brackets.
Marking and trimming bracket
Pieces cut
Welded mounting studs to bumper brackets 5/16 stud and washer.Final mounting with rubber grommet
Both ends mounted goes through bracket and is in front air stream
Line size is comparable to the TH350 lines from trans
Been researching how to control that Taurus electric fan and am going to use the Volvo dual speed fan relay and a dual temp switch in the radiator.I will go into detail of these parts at a later time but for now making a bracket to mount the temp relay before engine comp gets scrubbed and painted.found a spot in the corner behind the battery.Will have more relays near there in the future for headlights ext.
I emailed the measurements to http://www.saldanaracingproducts.com/ but added a 1" hose barb for the tank and will add a bung for the coolant temp sensor. Didn't know what this wire was for but finally figured it went to the low coolant level switch in the radiator.
according to wiring diagram the switch gets grounded to the dash light so moved it over to the firewall and to the ford coolant bottle connector to hook it up there.Made some leads and hooked the bottle up to test light and lights when empty and not when flipped as to be full so the wire should work to show low coolant.
wired to plug,one to the coolant light wire and one to ground on the firewall.nice to know if for what ever reason coolant gets low.
picked up a water proof switch and mounted just below the headlight relays
soldered and shrink wrapped the plug from the fan relay and also to the fan plug
hi speed,low speed,and ground to plug
crimped soldered and did double shrinks on them
ran new wiring through some 1/2 loom conduit and fastened
got 4 sizes of fusible link wire and have one attached to the power supply on the fan relay
I have been looking at all the various ways people fab alternator only solutions for tight engine bays like the Vega/Monza. I'm going to take a close look at your other postings as well, since I'm swapping an 5.3L into a slant nose Vega also.
Thanks Your postings are very detailed, I like the way you designed the radiator. I have the same remote tank in my Suburban, maybe I will also add one to the Vega. Keep up the good work.